From Stitches to Masterpiece: Lacing
So, if you've been following on, and you wanted to just make a pillow or put your project in a quilt or some other option that does not require a frame or your project to be flat, you can skip from here on out. At this point, having cleaned, blocked and ironed your project it is ready to be sewn into whatever other plans you have for it.
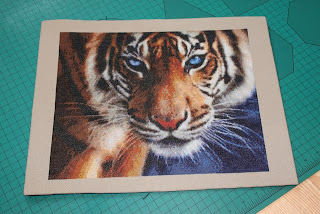
For the rest of us, our next step is Lacing. It could actually be Matting (next time!) depending on what you want to use for the back of your Lacing but for now, we're going to do Lacing.

Lacing is designed to hold your project flat while mounted/framed or even just as is so it looks well. It will help keep your project taut, showing the stitching off. Basically, it keeps it in place and makes sure all the effort you went to up until now to get it blocked and ironed stays that way over the test of time. A well laced piece will stay nice and smooth in its frame even years down the line.
What you need
Your project, having been cleaned, blocked and ironed
A strong thread (I prefer curtain thread)
A needle for said thread- it should have a sharp tip.
A piece of sturdy board that is slightly larger than your project
Paper clips/clothes pins/some manner of clipping things together

The board can be made of many things. It can be cardboard, mounting board, thick card stock, metal. If the frame came with a backing that did not have a stand attached, you can even use that although it may need to be shaved to fit with the fabric on it.
If you do not plan on mounting your project, the board needs to be large enough to fit your frame with a tiny bit of wiggle room so you can fit the fabric in as well. I find the easiest way to measure this is to take my project, the piece of board, and cut very fine slits off it until it fits the frame. Then go lace it up and stick it in the frame.
I'll talk more about proper sizing for the board in the next article, as it is very much tied to whether you want to mount your project before you frame it or not.
The How-To
This is actually much simpler than many people think it. And it is difficult to mess up with the exception of getting it square to begin with if you won't be mounting it.
Put the board on your lap, and your project on top of it.
You want to center it and make certain that the edges follow those nice straight lines you blocked in. With cross stitch fabrics, this is easier as you can follow the lines down the side, trying to make it all nice and even.
Paper clip it in place on one side and turn your project over.
Cut a long length of thread.
 Thread your needle and put a knot in it. I like to actually knot it on the fabric so its more likely to stay there. And if you're using Aida, make certain that your knot goes through the center of a block and not through a hole as you'll be tugging quite a bit and you do not want it to come out.
Start pulling 2 opposing sides together.

Using the thread, lace it up as if you were lacing a corset. Cross to the other side, stitch, cross back to the first. I usually do this loosely at first and then tighten it up all at the same time to prevent one side getting pulled out of alignment.
If you want this to stay, you need to pull it tight. Quite tight. I try to get it tight enough that I think if I pulled it any further the board would start bending, which you do not want.
Your paper-clipping is mostly a guide. You will need to make regular checks by looking at the front that you haven't shifted anything or pulled so tightly in one area that you're warping your project. Once you have it basically in place you can remove the clips so that you can wiggle it where it needs to be.
Don't be afraid to use tons of thread on this. I prefer to attach a new piece of thread and continue the lacing in one big thread as it works better for me. When you need to do this, just put a good solid square knot in the two pieces of string. This should make it possible for you to continue pulling but not have the thread detach.
 It is better to lace tightly, using a lot of thread in tiny laces, than to rip your fabric or have the tension uneven by widely spacing your lacings. It is just fine to lay down some guideline laces and then go back and lace the other direction filling in gaps, provided that the end result is a nice even tension across the whole project.

I find its best to get all the laces in place and then spend the time to two-handedly pull the laces to tighten them, lacing by lacing. Basically I pull one tight, hold it in one hand, and select another and pull on that to bring any looseness out. You need to get it nice and tight as it will relax eventually, and you want as little available.
Once you are done with one side, you have two options. You can either fold your corners, or you can cut them. I prefer folding wherever possible as then I can take the project off if I need to re-frame it and can still easily re-lace. Plus I hate having unfinished edges on any fabric medium.
 However, that isn't always possible. If your frame isn't very deep, the excess fabric can make it nigh on impossible to frame it, so if you need to, cut the excess fabric in a square from your project. Leave a little bit extra at the corner so that it doesn't fray and show on the front. Be careful not to cut any of your lacings out as you will have to re-do them!

When you're done, tie off your thread. Again, I find it easier to do this incorporating the knot on the fabric so that it is less likely to come out.
Now you do the lacings the same way you did on the first 2 sides, only this time you're pulling the other two sides together. Remember to try for a nice even tension across the board. This side should be much easier and you shouldn't have to check your alignment as much as the previous lacings should hold your project on the board anyway.


Finish off your lacing of that side and turn your project over. Is it square? Are there any bubbles? Is it warping in any place? If you're satisfied with it, then voila!
If you're not mounting it, you can stick it in your frame now and enjoy your beautiful work of art!

For the rest of us, our next step is Lacing. It could actually be Matting (next time!) depending on what you want to use for the back of your Lacing but for now, we're going to do Lacing.

Lacing is designed to hold your project flat while mounted/framed or even just as is so it looks well. It will help keep your project taut, showing the stitching off. Basically, it keeps it in place and makes sure all the effort you went to up until now to get it blocked and ironed stays that way over the test of time. A well laced piece will stay nice and smooth in its frame even years down the line.
What you need
Your project, having been cleaned, blocked and ironed
A strong thread (I prefer curtain thread)
A needle for said thread- it should have a sharp tip.
A piece of sturdy board that is slightly larger than your project
Paper clips/clothes pins/some manner of clipping things together

The board can be made of many things. It can be cardboard, mounting board, thick card stock, metal. If the frame came with a backing that did not have a stand attached, you can even use that although it may need to be shaved to fit with the fabric on it.
If you do not plan on mounting your project, the board needs to be large enough to fit your frame with a tiny bit of wiggle room so you can fit the fabric in as well. I find the easiest way to measure this is to take my project, the piece of board, and cut very fine slits off it until it fits the frame. Then go lace it up and stick it in the frame.
I'll talk more about proper sizing for the board in the next article, as it is very much tied to whether you want to mount your project before you frame it or not.
The How-To
This is actually much simpler than many people think it. And it is difficult to mess up with the exception of getting it square to begin with if you won't be mounting it.
Put the board on your lap, and your project on top of it.
You want to center it and make certain that the edges follow those nice straight lines you blocked in. With cross stitch fabrics, this is easier as you can follow the lines down the side, trying to make it all nice and even.
Paper clip it in place on one side and turn your project over.
Cut a long length of thread.

Start pulling 2 opposing sides together.

Using the thread, lace it up as if you were lacing a corset. Cross to the other side, stitch, cross back to the first. I usually do this loosely at first and then tighten it up all at the same time to prevent one side getting pulled out of alignment.
If you want this to stay, you need to pull it tight. Quite tight. I try to get it tight enough that I think if I pulled it any further the board would start bending, which you do not want.
Your paper-clipping is mostly a guide. You will need to make regular checks by looking at the front that you haven't shifted anything or pulled so tightly in one area that you're warping your project. Once you have it basically in place you can remove the clips so that you can wiggle it where it needs to be.
Don't be afraid to use tons of thread on this. I prefer to attach a new piece of thread and continue the lacing in one big thread as it works better for me. When you need to do this, just put a good solid square knot in the two pieces of string. This should make it possible for you to continue pulling but not have the thread detach.


I find its best to get all the laces in place and then spend the time to two-handedly pull the laces to tighten them, lacing by lacing. Basically I pull one tight, hold it in one hand, and select another and pull on that to bring any looseness out. You need to get it nice and tight as it will relax eventually, and you want as little available.
Once you are done with one side, you have two options. You can either fold your corners, or you can cut them. I prefer folding wherever possible as then I can take the project off if I need to re-frame it and can still easily re-lace. Plus I hate having unfinished edges on any fabric medium.


When you're done, tie off your thread. Again, I find it easier to do this incorporating the knot on the fabric so that it is less likely to come out.
Now you do the lacings the same way you did on the first 2 sides, only this time you're pulling the other two sides together. Remember to try for a nice even tension across the board. This side should be much easier and you shouldn't have to check your alignment as much as the previous lacings should hold your project on the board anyway.


Finish off your lacing of that side and turn your project over. Is it square? Are there any bubbles? Is it warping in any place? If you're satisfied with it, then voila!
If you're not mounting it, you can stick it in your frame now and enjoy your beautiful work of art!

Comments
Post a Comment